
Streamline SEPA Bank Detail Collection: A Serverless Approach with Stripe and Cloudflare Workers
Unlocking additional payment flows is a game-changer for businesses of all sizes. Low-code and no-code tools make it possible for more businesses to handle their payment flows directly on the Stripe platform. For example, it's possible to send a customer a link to enter their card details, then generate invoices which will automatically charge this card, all without leaving the dashboard. This opens up a whole new world for businesses looking to grow quickly, and for the finance teams asked to support that growth!
For larger value transactions, due to the fees involved, businesses will often prefer to accept payment methods other than credit cards. In Europe, SEPA is the name of the bank-based scheme, and needs to be handled a little differently to credit cards. Currently Stripe support saving SEPA details via Checkout session. These sessions are short-lived, single-use sessions, which must be initiated by code. The end user is shown a screen where they agree to have their bank account debited (the "mandate") - this is a compulsory part of compliance when working with SEPA.
Generating a Checkout session would be typically be done by having a developer add some code to your website, send customers to a particular URL, and have that code generate the session for them. Once a user's details are saved, they can then be charged by invoices generated in the dashboard (or via API), just like with credit cards.
But what if you're a business who doesn't have a large web development team, or the ability to create new pages on your website for this purpose? Perhaps you're a relatively small accounts department in a large company, you need to accept SEPA details for a number of customers you want to invoice regularly, but would struggle to get through the processes to get a change implemented on the old company website which everybody is afraid to touch!
One solution is to make use of Stripe's Checkout sessions alongside Cloudflare workers. This will allow us to generate a link we can share with our potential customers, allowing us to capture SEPA details for later charging via Stripe. Making use of Cloudflare workers allows us to do this in a "serverless" way - we can handle it all within Cloudflare, not needing to run any additional servers of our own, or change any existing sites!
This involves putting a small bit of code together - it's walked through in detail below, with the fully-coded example available on Github.
What is Cloudflare, and what are Cloudflare Workers?
Cloudflare is a leading Internet security and performance company that powers large parts of the internet. They offer DNS management, SSL/TLS encryption, content delivery network (CDN), and other solutions to enhance website security, performance, and reliability.
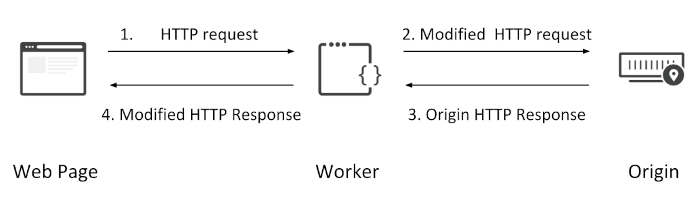
Cloudflare workers are javascript functions which run directly on Cloudflare - between our server and the end user. This allows us to have code deployed at, and running on, the edge of Cloudflare's network, modifying requests before they even hit our backend servers. This allows, for example, complex caching strategies, or content personalisation to be applied. A request comes from the user, and is either modified by the worker on the way to the backend, or modified on the way back out from the server to the user, with the end user ultimately receiving the response.
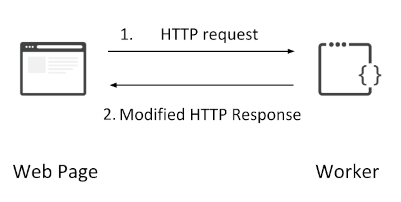
One other benefit of workers is that they can be used to offer a "serverless" experience. What if we can handle the full user request inside a worker, without needing to go to a server? We wouldn't need a machine at all, and could rely entirely on Cloudflare's network to host and serve our content, drastically simplifying our infrastructure management needs! This is the approach we're going to take for this demo.
Creating a Cloudflare worker to accept SEPA details
It's possible to edit workers directly inside the Cloudflare interface, but for the purpose of this example, we are going to edit the code on a local machine before deploying it to Cloudflare.
Cloudflare provides the Wrangler tool to handle the main parts of project creation and deployment. It's a Node.js-based project, so the latest versions of Node.js and npm will be required.
Install Wrangler
After installing Wrangler, a link needs to be made between your local wrangler installation and your Cloudflare account.
wrangler login
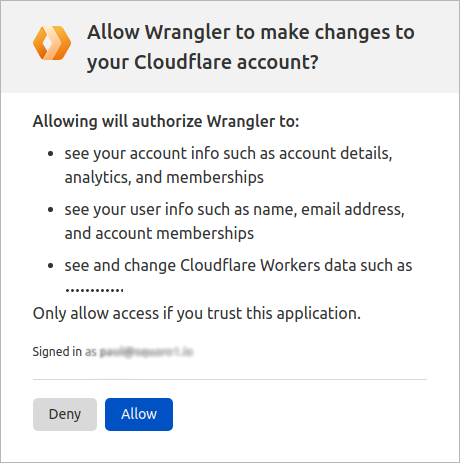
This command will begin an authorisation process with Cloudflare. Within your browser, you'll see a dialog explaining all of the permissions you're about to share with the wrangler application.
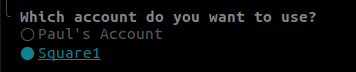
After authoring wrangler in the browser, go back to the console, and login should be complete. If you have more than one Cloudflare account tied to your login, within the console you'll be asked which account you want to use. Use the arrows on the keyboard to select the right one, press enter, and login should be completed.
Create Stripe project
Next we want to create a project, and save the stripe node library to that project. The name of this project will be shown throughout Cloudflare, so make sure it's descriptive! In our case, we're going with sepa-details-example.
# Create project
npm init cloudflare sepa-details-example
This will walk us through a wizard to do some basic configuration of our project. The first question we're asked is what type of project we want. We only want a thin shell of a project which we can build on, so "Hello World" is the option to select here.

You'll also be asked if you want to use typescript (for this simple demo, we said "no", but choose "yes" if you're happy working with typescript), and whether we want to deploy our project now. Choosing "yes" to deployment will set our "Hello World" example live, at a url based on the project name and your account name. In our case, we have chosen sepa-details-example, using an account named square1, so get the url sepa-details-example.square1.workers.dev.

Once we have our basic project set up, we want to make sure that we'll have the Stripe library available to work with.
# Save stripe lib
npm i --save stripe
We now should have a shell of a project, with a structure like the below:
|- node_modules
|- src
   |- worker.js
|- package-lock.json
|- package.json
|- wrangler.toml
We'll be doing most of our work in src/worker.js, so you can open that in your code editor of choice.
Local development
Ideally we want to be able to test the code locally before deploying it. Clicking into our worker.js file, there are comments like the below:
/**
 * Welcome to Cloudflare Workers! This is your first worker.
 *
 * - Run `npm run dev` in your terminal to start a development server
 * - Open a browser tab at http://localhost:8787/ to see your worker in action
 * - Run `npm run deploy` to publish your worker
 *
 * Learn more at https://developers.cloudflare.com/workers/
 */
At the time of writing (June 2023), Cloudflare is in the process of updating a lot of wrangler functionality, and some things don't quite work as advertised. For example, the above command npm run dev to run the project locally doesn't work - dev isn't defined by default in the shell package file generated. Instead, wrangler dev is the way to run the code in a local browser.
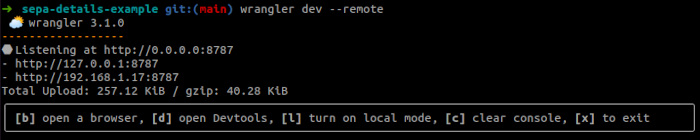
If you're running Linux, you may have some issues running this locally, due to some issues with libc++. This thread goes into detail on the possible workarounds. If you are running into issues getting local dev running, you can run in remote dev mode. This will deploy a bundle remotely for testing, and allow you to load it via a local url:
wrangler dev --remote
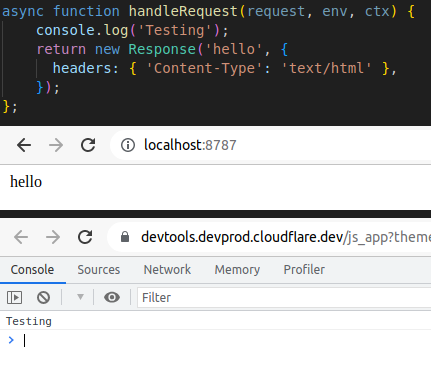
Once test mode has begun, you can open the page in a browser, and in a separate panel have Dev Tools open. This is really handy for when you're trying to debug an issue - it functions like the dev tools in Chrome on a regular website, showing console errors or javascript execution problems. In the screenshot below, we can see how the code in the top part of the image sends data to both the console and to the screen, and how that renders in the browser and dev tool windows.
Saving the Stripe secret key
To create Checkout sessions, we'll need a Stripe secret key. This value can be retrieved from the Stripe Dashboard. As it's sensitive information, we don't want to save it as part of our code. Instead, we'll use Cloudflare's secrets storage to protect it, and reference that secret from our code.
# This will lead to a prompt to enter a key, saved as STRIPE_API_KEY
wrangler secret put STRIPE_API_KEY

# Show the name of all secrets currently stored
wrangler secret list
[
  {
    "name": "STRIPE_API_KEY",
    "type": "secret_text"
  }
]
Creating a checkout session
Open up src/workers.js. We're going to replace the contents of this file with code which will:
- Load the stripe library
- Create a checkout session to capture SEPA details
- Automatically redirect the user to that page
// Load Stripe library
const Stripe = require("stripe");

export default {
  fetch: handleRequest
};

async function handleRequest(request, env, ctx) {
  // Load Stripe environment, using our
  const stripe = Stripe(env.STRIPE_API_KEY, {
    httpClient: Stripe.createFetchHttpClient()
  });

  /**
   * Create a checkout session to set up our payment method
   */
  const session = await stripe.checkout.sessions.create({
    // We only care about SEPA, so limit the payment method types
    payment_method_types: ['sepa_debit'],

    mode: 'setup',
    // Ensure that a customer record is created. This is key!
    // This is what allows us to later charge user.
    customer_creation: 'always',
    // @TODO: Where should the user go once the details have been
    // entered? Let's come back to this later..
    success_url: 'https://www.example.com/?success=1',
    cancel_url: 'https://www.example.com/?retry=1'
  });

  return Response.redirect(session.url, 303);
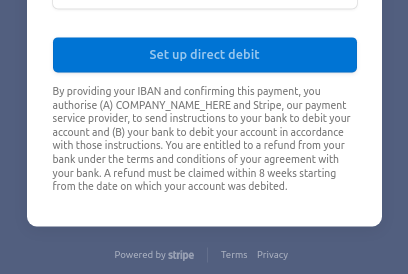
Now we have this set up, we can run wrangler locally, and see what happens. When we visit the wrangler URL http://127.0.0.1:8787, we should get redirected to a checkout.stripe.com URL. We have saved a "test mode" Stripe key, so our session has a "TEST MODE" badge visible.
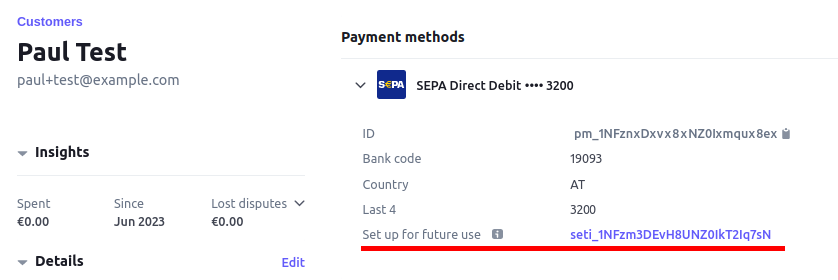
This means that we can test the flow using Stripe's test IBAN details. Once we enter those details and hit "Set up direct debit", we can check the Stripe Dashboard, and see that our customer is in there, with the SEPA details attached, ready for "future use".
These details can then be used to create an invoice directly from the dashboard, and have it paid automatically via this saved payment method.
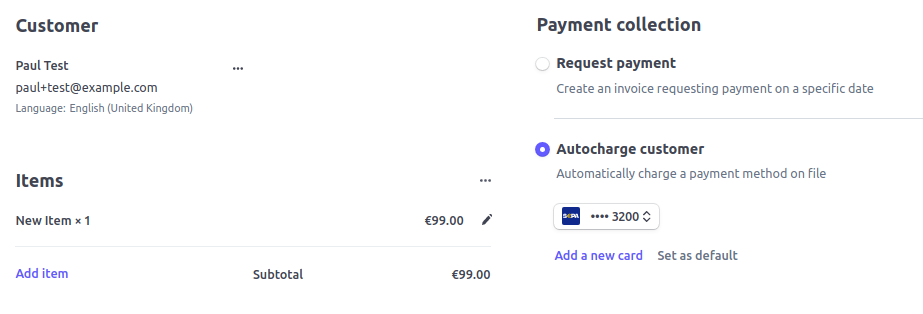
One fly in the ointment here is that once our user entered their SEPA details, they ended up on a page at example.com which was not particularly informative! So let's handle the post-save messaging next.
Handling post-save messaging
In our previous code, the success_url and cancel_url are pages which the user is sent to if they either complete the Checkout form successfully, or back out of it. We need to give specific URLs for these cases, but fortunately we can handle it all from within our one worker!
Let's go back to our workers.js example. Let's move our code to build a Checkout session to its own function, and make it aware of our current URL.
async function handleRequest(request, env, ctx) {
  // Parse the request URL into an object we can work with
  const url = new URL(request.url);

  return redirectToCheckout(env.STRIPE_API_KEY, url);
};

async function redirectToCheckout(key, url) {
  const stripe = Stripe(key, {
    httpClient: Stripe.createFetchHttpClient()
  });

  // Get our current path minus any query parameters
  const baseUrl = `${url.origin}${url.pathname}`;

  /**
   * Create a checkout session to set up our payment method
   */
  const session = await stripe.checkout.sessions.create({
    payment_method_types: ['sepa_debit'],

    mode: 'setup',
    // Ensure that a customer record is created. This is key! This is what
    // allows us to later charge this payment method.
    customer_creation: 'always',
    // If we're running on www.sepa-details-example.com, the user will
    // be redirected to www.sepa-details-example.com?success=1 etc
    success_url: baseUrl+'?success=1',
    cancel_url: baseUrl+'?retry=1'
  });

  return Response.redirect(session.url, 303);
}
The baseUrl value will contain the path for wherever our script is running. We're telling Stripe to send users back to that address, with a ?success=1 parameter if things have gone well, and a ?retry=1 if not.
If we deploy this as-is, we'll end up in a nasty infinite loop! Our code isn't yet aware of how to handle the different success/retry parameters, so will keep redirecting users to Checkout sessions. Let's sort that out first.
async function handleRequest(request, env, ctx) {
  const url = new URL(request.url);

  if (url.searchParams.get('success') === '1') {
    return showSuccess();
  } else if (url.searchParams.get('retry') === '1') {
    return showRetry();
  } else {
    return redirectToCheckout(env.STRIPE_API_KEY, url);
  }
};

async function showSuccess() {
  return new Response('Thank you!', {
    headers: { 'Content-Type': 'text/html' },
  });
}


async function showRetry() {
  return new Response('Oops, please try again!', {
    headers: { 'Content-Type': 'text/html' },
  });
}

async function redirectToCheckout(key, url) {
  ...
Check this out in development mode, and now when the SEPA details are saved successfully, we get an acknowledgement. Similarly, if we hit the back arrow beside the company logo on the Checkout session, we're also handling the retry case. Happy days!
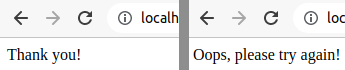
That said, the design does have more than a shade of "hacked Wordpress phishing site" to it - not exactly instilling confidence in our ability to work with sensitive payment information! So let's make it look a little nicer.
Styling the success and retry pages
All we need are two presentable-looking pages, for our success and retry cases. For this, we'll use Tailwind, specifically the Tailwind CDN, to enable us to put together visually-appealing pages with a minimal amount of coding. Including the tag <script src="https://cdn.tailwindcss.com"></script> on our page allows us to take advantage of the full Tailwind CSS toolkit without needing to worry about loading particular CSS libraries on to our page. The CDN will parse the tailwind values we use, and generate an on-the-fly CSS sheet to deliver just the styles we need. In a typical high-traffic application, this wouldn't be an ideal solution, but for our purposes here it'll do just fine!
For our "success" case, we're going to use a simple alert notification in a centred dialog. The full html is truncated for legibility here, but is available for reference on Github.
async function showSuccess() {
  const page_title = 'Thank you!';
  const heading = 'Details saved successfully!';
  const message = 'Thank you - your payment details have been submitted '
    +'successfully! We\'ll be in touch soon.';

  const content = '<!doctype html><html><head><title>'+page_title+'</title>
    <script src="https://cdn.tailwindcss.com"></script>
    ...
    <p class="text-sm text-gray-500">'+message+'</p>
    ...
    </body></html>';

  return new Response(content, {
    headers: { 'Content-Type': 'text/html' },
  });
}
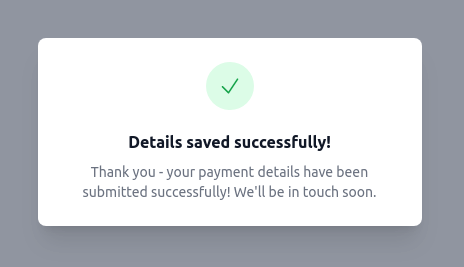
Much better! With the template set in place, we've extracted the key strings out to page_title, heading, and message variables. This allows us to tweak the wording quickly if required, without getting bogged down in HTML editing.
Now that we've done the "success" version, what about the retry case? We say "retry" rather than "failure" here, as if there's a failure when entering the information, Stripe's Checkout interface will handle it and show a message. The case we're concerned about here is when someone has hit the back arrow next to the company logo, so may need an opportunity to restart the process.
Again, we take inspiration from Tailwind, and the warning icons available.
async function handleRequest(request, env, ctx) {
  const url = new URL(request.url);

  ...
  } else if (url.searchParams.get('retry') === '1') {
    return showRetry();
  ...
}

async function showRetry(url) {
  const page_title = 'Please try again';
  const heading = 'Sign up unsuccessful';
  const message = 'Please click the button below to try again.';
  const button_text = 'Try again';
  const try_again_link = `${url.origin}${url.pathname}`;

  const content = '<!doctype html><html><head><title>'+page_title+'</title>
    <script src="https://cdn.tailwindcss.com"></script>
    ...
    <p class="text-sm text-gray-500">'+message+'</p>
    ...
    <a href="'+try_again_link+'"><button type="button" class="inline-flex ...">'+button_text+'</button></a>
    ...
    </body></html>';

  return new Response(content, {
    headers: { 'Content-Type': 'text/html' },
  });
}

This looks much better! The try_again_link value is now being populated by the url we're passing to this function. We just need to send the user back to our main page to restart the process.
Configuring our checkout appearance
Now that we've styled our success and retry pages, we can also tweak the appearance of the Stripe Checkout page, to bring it a bit more in line with whatever branding we want to use.
Go to the branding settings within the Stripe dashboard. From here, we can set a logo, an icon, and choose brand and accent colours.
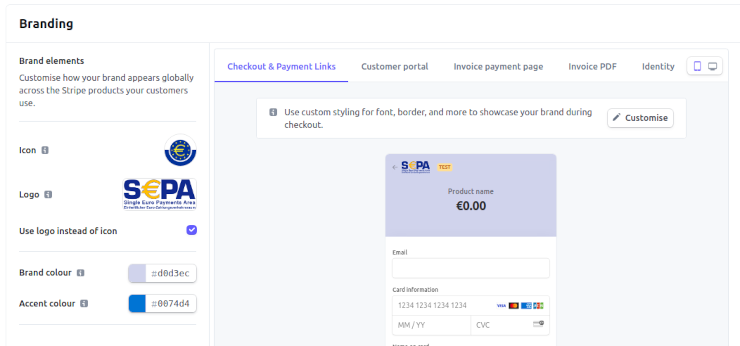
We can see a live preview in the dashboard of our chosen colours and logos. Clicking "customise" also gives us the option to tweak the font and button style (rounded/sharp edges), if we have really specific brand guidelines to follow.
Click "Save changes" on this page, and the changes are implemented pretty much immediately on any Checkout links.
Deploy worker to Cloudflare
With the code saved and ready to go, we now need to deploy to Cloudflare.
wrangler deploy
Once that deployment has completed, you should see the worker listed inside Cloudflare.

Link URL to worker
Now that we have a worker deployed to Cloudflare, we need to link up a URL to serve it.
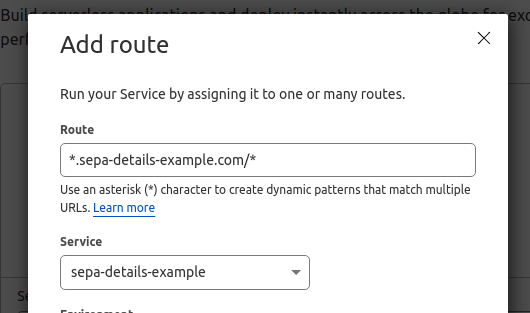
Go to the domain we want to use, then select "Workers Routes" from the left hand nav. Click "Add Route", and a modal will appear for us to define our route.
We can create a "virtual" page on an existing domain. In this example, we are:
- Telling Cloudflare to run a worker for any requests to my-website.com/sepa-details
- Use the
sepa-details-exampleworker we've created

If we have registered a new domain just to handle this case, we can ensure that all requests to the domain are handled by the worker:
A risk here is that any requests to the domain by bots would trigger the worker and may threaten your quotas, so that's something to keep an eye on! If you are going to use a full domain, many browsers will automatically request /favicon.ico when visiting a site for the first time. To avoid redundant checkout sessions being created, we can make a small change to worker.js to tell it to return an empty response if a favicon is requested:
async function handleRequest(request, env, ctx) {
  const url = new URL(request.url);

  // Don't burn checkout sessions on browsers which
  // are automatically looking for a favicon
  if (url.pathname == '/favicon.ico') {
    return;
  }
One important note when setting up workers is that the domain you want the worker to run on has to be running behind a Cloudflare proxy. Within DNS settings, check that the cloud next to the DNS record for this domain is orange.

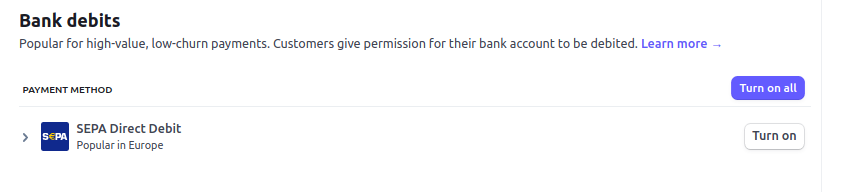
Stripe preparation
SEPA is available in test mode as soon as you create a Stripe account. Before going live with this, ensure that the SEPA Direct Debit payment method is activated on your live account. This may require some additional verification steps, and those verification steps can sometimes take a while to sort out, so don't leave this until the last minute!
Also beware of account limits - by default SEPA transactions will have a limit of €10,000 per transaction, with new accounts also being limited to a max of €10,000 per week across the whole account (this lifts over time). If you intend to process more than €10,000 in your first couple of weeks, it's best to reach out to Stripe support to get that limit increased early!
Can I use this same approach for anything more than Checkout sessions?
Absolutely! The library we included at the start is the full Stripe Node.js library, which makes the full Stripe API available. Whether it's validating webhooks signatures, listing products from our Stripe account, or redirecting users to the Billing Portal, we're not limited just to Checkout here!
On the other hand, if your goal is to sell specific items to your users (books, courses, etc), then rather than Checkout sessions, it may be worth looking at Stripe's Payment Links product. This lets you specify product details, then get a Stripe-hosted URL you can share with your potential customers.
Where's the code?
You can find the full code for this walk-through on Github.