
Bookmarklets – a quick introduction!
I’ve been tinkering quite a bit lately with improving the twitter web interface with the use of bookmarklets. I’ve put together a series of bookmarklets which allow you to do everything from apply custom filters to your twitter timeline, to removing the “Hovercards” which Twitter have recently added.
Most of the feedback I’ve received both in the comments here and on twitter has been very positive, but I’ve also heard from a few folk who have had difficulty actually saving the bookmarklets and getting them to work.
Admittedly, the posts on the bookmarklets did assume a certain level of technical know-how, so this post is intended as a quick intro for those who want to use the bookmarklets, but aren’t quite sure where to start.
So what is a bookmarklet?
A bookmarklet is:
a small computer application, stored as the URL of a bookmark in a web browser or as a hyperlink on a web page. […] They are designed to add one-click functionality to a browser or web page. When clicked, a bookmarklet performs some function, one of a wide variety such as a search query or data extraction.
So bookmarklets basically allow us as a user to add some basic functionality to a web site from our browser, without needing to have access to that site’s server. Once the bookmarklet is clicked, whatever javascript it contains will execute on the current page.
In this case, we have bookmarklets specifically crafted for twitter’s web site (filtering our timeline, removing hovercards, etc) so when we go to twitter.com and click the bookmarklet, our custom code shall be run by our browser as if it were part of twitter’s own code.
So, how do we save and then run these bookmarklets? Well, there are several different options...
Option 1 – Drag and drop!
Probably the quickest way of saving a bookmarklet is to drag it from it’s location on the page and drop it on your bookmark bar. First, we need to make sure the bookmarks bar is accessible. The bookmark bar is typically found immediately under the address bar in your browser (highlighted in red on the image below).
If you’re running Firefox or Internet Explorer, then it should be showing by default. On Chrome, you may have to press “Ctrl+B”, or go to “Settings” (spanner icon) then click “Always show bookmark bar”.
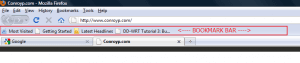
Once your bookmark bar is visible, you can click on a bookmarklet link, drag it to this bar, then have it ready to run!
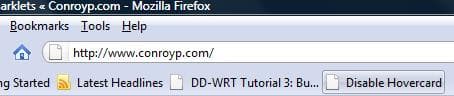
So, given this Disable Hovercard link, all you need to do is:
press your mouse down on the link above (do not let go of the mouse button!)
- drag your mouse to an empty spot on your bookmark bar
- let go of the mouse button
You should know see a “Disable Hovercard” bookmarklet on your bookmark bar. Go to twitter.com, click this bookmarklet and you should not see any more hovercards!
Option 2 – Let the browser do it
Most browsers have menu options which will do the same thing as the dragging-and-dropping above.
Internet Explorer
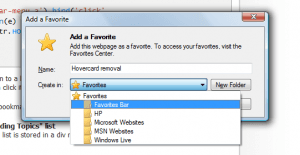
- Right-click on the “Disable Hovercard” bookmarklet link
- Select “Add a Favourite..”
- You can re-title the bookmarklet using the “Name” field, if you want
- Select “Favourites Bar” from the “Create in” menu
- Press “Add”
Firefox

- Right-click on the “Disable Hovercard” bookmarklet link
- Select “Bookmark This Link”
- If you want, you can rename the bookmarklet using the “Name” field
- Select “Bookmarks Toolbar” from the “Folder” drop-down
- Click “Save”
Chrome
Currently, Chrome doesn’t have an easy right-click option for saving bookmarklets, so if you’re on Chrome, you’ll have to follow Option 1 above!
That’s all folks!
And that’s all there is to it! You should now have a “Disable Hovercard” bookmarklet on your bookmark bar. To see it in action:
- go to twitter.com and log in
- mouse over a username in a tweet to see the hovercard appear
- click the bookmarklet
- mouse over the same username, and – hey presto – the hovercard should now be gone
And that’s all there is to it! The same process can be applied for any other bookmarklet, including the timeline filtering bookmarklet (remove those foursquare check-ins, xbox achievements and other such auto-tweets!)
So hopefully this post should help make things a little clearer for those who were having trouble with the bookmarklets previously – if not, let me know in the comments below!