
Mailcatcher, Vagrant & Laravel: Email testing made easy
When doing any sort of non-trivial development, sooner or later you’ll likely end up having to send emails from your application. Email is a key part of many application for things like event notifications or user account verification. Testing that the right mails get sent at the right times can often be more hassle than it really should be. Fortunately, a tool called Mailcatcher exists to make this process much easier.
The problem
Testing email during development can be a pain. Setting up a machine to send email to the outside world is dangerous, running the risk of inadvertently emailing real users with test data. Even if you’re sure you’re only emailing addresses you control, there’s the occasional delays in mail coming through and the possibility of getting caught in over-zealous spam filters. These issues all add unnecessary delays to development.
In frameworks like Ruby on Rails or Laravel for PHP, mails sent in test mode can be easily directed to a log file rather than being sent. This helps test the flow of firing mails, but doesn’t help much with one of the biggest challenges of sending email – seeing how the message will be rendered once received.
Enter Mailcatcher
Mailcatcher is a ruby gem that runs a local SMTP server. It intercepts all outgoing mail and presents it through a webmail-like interface on port 1080.
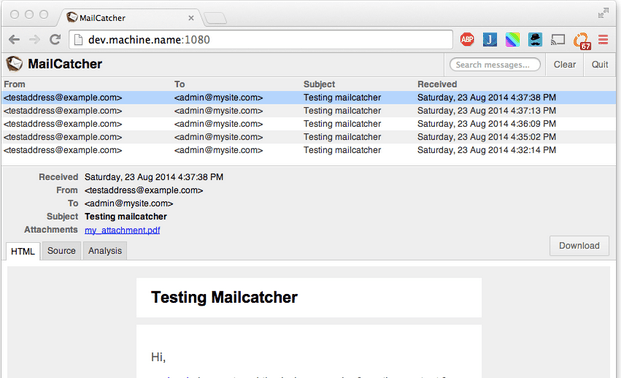
The web view will default to showing the html version of your mail. While this isn’t guaranteed to be 100% the same rendering your users will see due to the vagaries of email client rendering, it’ll give you a strong idea of how the mails will probably be rendered. This should enable you to easily catch things like obvious formatting errors. This web view also makes use of web sockets to update in real time as new mails come in. If your browser doesn’t support web sockets yet, then a refresh of the page will load the messages.
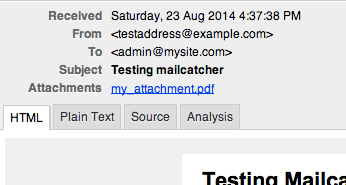
Each message also has tabs enabling the plaintext version of the message to be seen, as well as the raw message source. If an attachment has been sent with the email, it’s also there, ready for download!
Setting up Mailcatcher
Fortunately setting up Mailcatcher is very straight forward. We’re using Vagrant to manage our development boxes. Vagrant is a great tool that makes it very easy to set up and deploy uniform development environments on virtual servers. We’re going to set up Mailcatcher and have it installed on our virtual machine.
We’ll make a bash script to handle the install process, setup_mailcatcher.sh. The gist here contains the commands we need, so our setup script can be as simple as:
#!/bin/bash

# Get Mailcatcher setup commands from gist and apply them
curl https://gist.githubusercontent.com/conroyp/741c30c44f5295f41422/raw/f86ee70bede0748292c3a21d34ab23da1696a0dc/setup_mailcatcher.sh | bash
If you’d rather not pipe the gist straight in to your shell, you can copy the contents of the gist to setup_mailcatcher.sh, which will get the same result.
#!/bin/bash

# Install dependencies
apt-get install libsqlite3-dev ruby1.9.1-dev
# Install the gem
gem install mailcatcher

# Make it start on boot
echo "@reboot $(which mailcatcher) --ip=0.0.0.0" >> /etc/crontab
update-rc.d cron defaults

# Make php use it to send mail
sudo echo "sendmail_path = /usr/bin/env $(which catchmail)" >> /etc/php5/mods-available/mailcatcher.ini
# Notify php mod manager (5.5+)
sudo php5enmod mailcatcher

# Start it now
/usr/bin/env $(which mailcatcher) --ip=0.0.0.0
Once that file has been saved, we ensure it’s executed when the machine is being built by adding the below line to our vagrantfile:
config.vm.provision "shell", path: "relative/path/to/setup_mailcatcher.sh"
Next we run vagrant provision to apply these changes to our virtual machine. Once the machine has been built, we should now have the Mailcatcher interface visible at http://dev.machine.name:1080
If you’re not using Vagrant, running the shell script on your local machine will result in Mailcatcher being visible at http://localhost:1080.
Setting up Laravel to use Mailcatcher
In your app/config/local folder, add the file mail.php. This will ensure that the configuration options for Mailcatcher are only applied to your local environment, and don’t interfere with mail being sent on production machines.
<?php

return [
    ‘driver’        =>  ‘smtp’,
    'host'          =>  '127.0.0.1',
    'port'          =>  1025,
    'username'      =>  '',
    'password'      =>  '',
    ‘encryption’    =>  false,
    ‘from’          =>  [
        ‘address’       =>  ‘testaddress@example.com’,
        ‘name’          =>  ‘Email Testing’
    ]
);
And that’s all there is to it!
Now when you send emails via your Laravel app, they should show up in Mailcatcher immediately, hopefully making testing that part of your app that little bit easier than before!

IPC Munich 2025
In October 2025, I'll be speaking at the International PHP Conference in Munich. I'll be talking about Modern PHP Features You’re Probably Not Using (But Should Be). Expect real-world examples, practical takeaways, and a deep dive into cleaning your code while making your life easier!
Get your ticket now and I'll see you there!